
Like any power transmission component, roller chain requires careful and accurate installation to ensure trouble-free operation and long life. Though roller chain installation is a fairly simple process, certain precautions must be taken and maintained in order to achieve the desired results.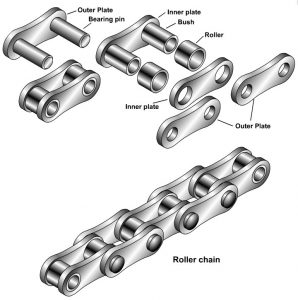
- Roller chain, sprockets and other components are in good condition
- The shafts and sprockets are properly aligned
- The chain is properly tensioned
- Provision is made for adequate lubrication
This roller chain installation and inspection guide, created together with power transmission experts at Bearings Limited, provides general recommendations for: how to install a chain on the equipment, checking the accuracy of the installation, testing and lubrication for start-up.
Roller Chain Installation – 4 Steps
REQUIRED TOOLS: You will need an angle grinder, chain vise, punch or chain screw, hammer and either a straight edge, level or laser alignment tool.
- Step 1: Grind the riveted portion of the two pins with the angle grinder (remove the cotter pins if necessary).
- Step 2: Secure the chain in the chain vise. Use the primary and secondary punch (or chain screw) and remove one set of pins.
- Step 3: Check both parallel shaft alignment and sprocket axial alignment using a straight edge, level or a laser alignment tool. Misalignment results in uneven loading across the width of the chain and may cause roller linkplate and sprocket tooth wear. Remember to place the sprockets as close to bearings as possible.
- Step 4: Install both ends of the chain onto the sprocket and join with the connecting links, then fastened by a spring clip or cotters (it may be necessary to have assistance to support the chain as the connection is made).
Post-Installation Best Practices
Chain Slack / Tension
After installing the chain, you must check the accuracy of the installation. Verify the amount of slack and the precise positioning of the shafts.
Some form of chain length adjustment must be provided to ensure maximized chain life, preferably by moving one of the shafts. Chain slack should be about 4-6% mid-span movement in horizontal drives and 2-3% in vertical drives.
Giving the chain a short test run is important. This is not only to see if the installation was successful, but to also regulate oil delivery to the chain.
Inspection
When inspecting the chain, be sure to check for the following conditions:
- Cracks in the rollers
- Cracks in the link plates
- Rotated Pins
- Wear on the end surfaces of the link plates
- Loud noises or excessive vibrations in the chain
If any of these conditions are found, take immediate action to correct the problem.
Roller Chain Lubrication
Lubrication of the chain depends on the temperature, chain speed and the working environment of the chain. Wear is caused by bearing pressure, angle-sliding movements of the pins and rotation of the rollers. There are five lubrication methods.
- Manual Lubrication
- Drip Lubrication
- Oil-Ring Lubrication
- Oil Bath Lubrication
- Force-Feed Lubrication
PREVENT FREQUENT CHAIN REPLACEMENT BY SELECTING THE BEST CHAIN FOR YOUR ENVIRONMENT
For washdown and humid environments, high quality, heat-treated carbon steel chain, like TRITAN, provides a major advantage between at temperatures up to 500°f.
See Why Customers Are Choosing TRITAN Chain »
- Seam-Oriented Bushings
- Bushing adopted from positioning assembling can improve wear resistance of the chain
- Design of Link Plate Waist
- Increase in width of waist for combating fatigue
- Common link plate contours vs. wide-waist link plate contours
- Ball Drift
- The place holes are finally ball-burnished to assure maximum resistance to fatigue failure
- Shot Peened Parts
- Link plates and rollers are shot peened for greater fatigue strength
IBT carries a full line of TRITAN Bearings and Power Transmission Components, providing customers with the highest levels of service and inventory support. The full line of chain includes drive chain, conveyor chain, specialty chain and quality roller chain at a competitive price and in Nickel Plated, Stainless Steel and Dacromet Coated variations. Contact your local IBT Branch to learn more today.