


In the intricate world of industrial machinery, where precision and reliability hold the utmost importance, the V-belt plays a crucial role. Proper V-belt installation can make all the difference in maximizing performance and longevity in industrial settings. To ensure you’re on the right path, we’ve collaborated with Continental, a trusted leader in V-belt solutions known for their unwavering commitment to excellence and innovation. This comprehensive guide, shaped by Continental’s expertise, will guide you through every step of the V-belt installation process, from sheave inspection to tensioning, providing you with the insights you need to keep your industrial systems running smoothly.
1. Inspect Sheaves
 Before diving into V-belt installation, it’s essential to understand the significance of inspecting sheaves. These seemingly humble components are critical to system performance. Continental’s commitment to quality ensures their V-belts perform optimally when paired with well-maintained sheaves. Here’s how to inspect them:
- Disconnect power supply to the machine before removing or installing sheaves or belts.
- Use a stiff brush to remove rust and dirt.
- Wipe off oil and grease with a soft cloth.
- Select the appropriate sheave groove gauge and template based on the sheave diameter.
- Insert the gauge into the groove and look for voids that may indicate wear or abnormalities.
An alternative method is to place a new belt in the sheave groove. The top of the belt should be flush with or slightly above the sheave‘s outer diameter. If the belt is below the outer diameter, the groove is worn, and further inspection is needed.
2. Install Hardware
Always select the correct sheave, and once selected, ensure it is installed correctly. Safety is paramount, so before beginning any installation, follow lockout procedures to prevent accidents. Additionally, remember to disconnect the power supply to the machinery before commencing any work.
3. How to Install a Sheave with a QD® Hub
If your sheaves come equipped with a QD® hub, follow these installation steps:
- Insert the bushing into the hub and align the bolt holes.
- Insert the pull-up bolts and turn them finger-tight.
- Hold the loosely-assembled unit so the bushing flange faces the shaft bearings.
- Slip the unit onto the shaft and align the hub as desired.
4. How to Remove a Sheave with a QD® Hub
For safe removal of a sheave with a QD® hub, follow these steps:
- Place two of the pull-up bolts in the tapped holes in the sheave.
- Turn the bolts alternately and evenly to push against the bushing flange, acting as jackscrews to break the grip between the bushing and the hub.
5. How to Install Split Taper Bushing Sheaves
When dealing with split taper bushings, follow these installation steps:
- Loosely place the bushing in the sheave and start the capscrews.
- Position the assembly on the shaft, ensuring both edges of the sheave align with its mating sheave.
- Tighten the capscrews according to the instructions that come with the bushing.
6. How to Remove Split Taper Bushing Sheaves
For safe removal of split taper bushing sheaves, adhere to these guidelines:
- Remove all capscrews.
- Place two capscrews in the tapped holes in the flange of the bushing.
- Turn the bolts alternately and evenly until the sheave loosens.
- Remove the sheave/flange assembly from the shaft.
7. How to Install a Sheave with a Taper-Lock Hub
When installing a sheave with a taper-lock hub, follow these steps:
- Inspect both the bushing and hub, noting their respective half-holes.
- Insert the bushing into the hub and slide it onto the shaft.
- Align a threaded hub hole with a non-threaded bushing hole.
- Begin threading the setscrews into the hub’s threaded holes (do not tighten yet).
- Align both edges of the sheave with its mating sheave.
- Tighten the screws alternately and evenly, causing the bushing to wedge inward and grip the shaft.
8. How to Remove a Sheave with a Taper-Lock Hub
To safely remove a sheave with a taper-lock hub, follow these steps:
- Remove all setscrews.
- Place two setscrews into the holes threaded in the bushing only.
- Turn the setscrews alternately and evenly to unlock the grip and permit easy removal of the assembly without shock to the bearings or machinery.
9. Check Alignment
A V-belt’s lifespan is greatly dependent upon proper alignment. Follow these steps to check alignment between two sheaves using a straight edge:
- Check both front and back alignment points; the straight edge should touch the sheaves at the four indicated points.
- Ensure non-parallel shafts or sheaves not aligned axially are addressed, as they can cause angular misalignment.
Continental’s innovation shines with the Laser Alignment Tool. This tool simplifies alignment and attaches in seconds. When the highly visible sight line aligns within the target openings, the pulleys/sprockets are properly aligned, reducing costly maintenance and improving efficiency.
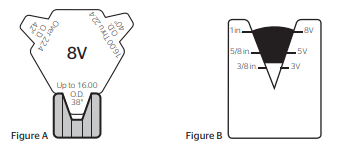
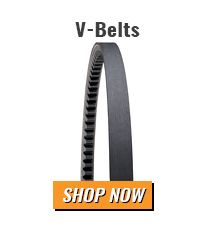
10. Identify Correct Belt
To select the correct belt for your sheave grooves, follow these steps:
- Use a sheave groove gauge to determine the proper belt cross-section (Figure A).
- Use a belt gauge to verify the old belt’s cross-section when belt identification is no longer legible (Figure B).
11. Matching Belts
Even in scenarios with multiple grooved sheaves, Continental’s dedication to holistic solutions shines. Here’s why matching belts is crucial:
- Always use belts of the same brand when using multiple grooved sheaves.
- Replace complete sets of V-belts, even if only one is worn or damaged.
12. How to Install Belts
Once sheaves are correctly installed and aligned, it’s time to install the belts. Follow these guidelines for a smooth installation:
- Ensure the drive unit is movable, allowing easy belt placement without the use of force.
- Never force belts into a sheave using tools like screwdrivers.
- Determine if enough clearance exists for belt installation and take-up.
13. Tensioning
Ensuring the right tension in your V-belts is not just an extra step; it’s a critical one. Proper tension is the crucial factor for achieving maximum belt life and operational efficiency. The consequences of incorrect tensioning, be it under-tensioning or over-tensioning, can be detrimental to both your budget and the health of your machinery.
Take a closer look at our step-by-step guidance on how to properly tension a V-belt and what to avoid when doing so.
Optimize Your Operations with V-Belts from Continental
Proper V-belt installation is the foundation of reliable and efficient industrial machinery. Through our collaboration with Continental, a trusted leader in V-belt solutions, we’ve provided you with a comprehensive guide to ensure your V-belt systems operate at their best. Continental’s commitment to quality, reliability, and innovation aligns seamlessly with the principles outlined in this guide. Their V-belt solutions are designed to enhance system efficiency, ensuring your operations run seamlessly. Continental’s wide range of V-belt solutions include:
- Envelope V-belts
- Cogged, Cut Edge V-belts
- Conti V (Narrow)
- Conti V (Classical)
- Conti VX Advance (Cogged Classical)
- Conti V (Cogged)
- Metric Belts
- Conti V Dual Belts
- Conti VX FHP
- Conti V Torque Team
- Conti V Multirib
Get Top Tier V-Belt Solutions from IBT
Whether you’re installing V-belts for the first time or looking to enhance your existing setup, IBT’s experienced professionals are here to help. We offer not only the highest-quality V-belts but also the knowledge and support to ensure your systems operate at peak efficiency.
Don’t leave the essential elements of your industrial operations to chance. Partner with IBT for reliable V-belt solutions and expert assistance. Contact us today to elevate your industrial systems to new heights of performance and longevity.
Shop Our Online Catalog of V-Belts
Check out ShopIBT.com to find the right V-belt solutions that meet your needs!
